Discover and buy more than 230,000 products
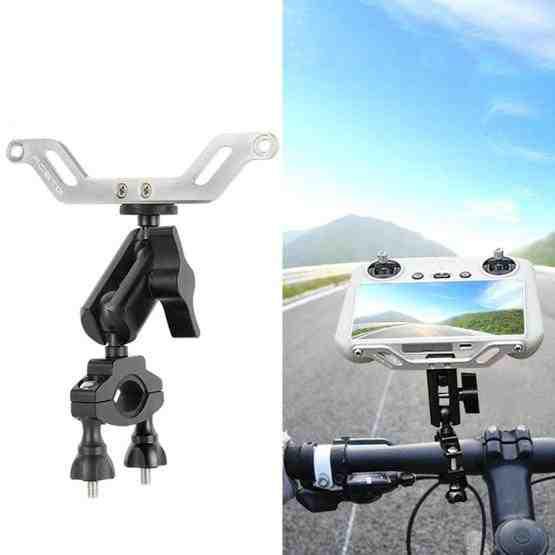

For DJI Mini 3 Pro RCSTQ Bicycle Cycling Bracket With Screen Remote Control And Drone Accessories(As Show)
Item TBD0603606001A

Warehouse: CN
Lead time: Item will be ready for ship between 15 Aug and 16 Aug 2025

Description
1. CNC technology, all-metal aluminum alloy material: the overall parts are made of aluminum alloy material, with high strength, high hardness and firm structure, not easy to loose, durable and more secure
2. Shooting while riding, free control: When taking pictures outdoors, you can fix the remote control through the bicycle bracket and control the remote control while riding
3. Reverse lock adjustment piece, human body gesture wrench, silicone non-slip pad
4. Universal adjustment of the pea clip: the multi-angle of the pea clip is flexible and changeable, and can be adjusted according to your needs
5. Compatible with horizontal/slash bars: the body pea clip is universally adjustable, and the angle is flexible, not only suitable for bicycle horizontal bars, but also for slash bars
6. The remote control connector is free from disassembly design. After use, just remove the bicycle bracket, and the remote control connector can be removed
7. Outdoor follow-up shooting, intelligent follow-up: Fix the remote controller with screen through the bicycle bracket to realize shooting while riding outdoors
8. Note: The product only includes the bracket, no other items are included
9. Applicable models: suitable for DJI Mini 3 Pro
10. Material: aluminum alloy
11. Size: 13.2x15.1x4cm
12. Net weight: 145.3g
13. Gross weight: 164.5g
Installation steps:
1. Tighten the remote control connector on the bicycle bracket by rotating clockwise
2. Use a screwdriver to turn the screw to secure the bike to the remote
3. Remove the knob and clamping block in turn
4. Install and fix the clamping block first
5. After tightening the knob
6. The installation is complete