Discover and buy more than 230,000 products

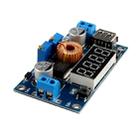
LDTR-WG0181 4-Digit 5A LED Drive Lithium Battery Charger with Voltmeter Ammeter DC to DC Module
Item ZY14082362L

Warehouse: CN
Lead time: Item will be ready for ship between 04 Aug and 05 Aug 2025

Description
Features
1. Input voltage range: 5-36V DC
2. Output voltage range: 1.25-32V DC adjustable
3. Output current: 0-5A
4. Output power: 75W
5. High efficiency up to 96%
6. Built in thermal shutdown function
7. Built in current limit function
8. Built in output short protection function
9. Input reverse polarity protection: None (if required, high current diode in series with the input).
Use as a step-down modules with overcurrent protection
1. Adjust the right button so that “OUT” LED lighted, Digital meter shows the value of output voltage ,adjust the “voltage potentiometer” so that the output voltage reaches the value you want.
2. Adjust the right button so that Digital meter shows the value of output current;Wire shorted output terminal, then adjust the “current potentiometer” so that the output current reaches a predetermined overcurrent protection value. (For example, the Digital meter displays the current value of 4A, then you can use the module to a maximum current of 4A)
3. Connected to the load.
Use as a battery charger
1. Make sure you need to charge the battery float voltage and charging current; (if lithium parameters 3.7V/2200mAh, then the float voltage is 4.2V, the maximum charging current 1C, ie 2200mA)
2. Under no-load conditions, adjust the "Voltage potentiometer" so that the output voltage reaches the float voltage; (if to 3.7V rechargeable lithium battery, the output voltage can be adjusted to 4.2V)
3. Adjust the right button so that Digital meter shows the value of output current;Wire shorted output terminal, then adjust the "current potentiometer" so that the output current reaches a predetermined Charging current value.
4. Charge turn lamp current factory default is 0.1 times the charging current; (Battery during charging current is gradually reduced, if the charge current setting is 1A, then when the charge current is less than 0.1A, blue lights turned off, the green light is on, which means that the battery is fully charged)
5. Connected to the battery charge.
(1,2,3,4 steps as: Output is unloaded, do not connect the battery)
Used as LED constant current drive module
1. Adjust the “voltage potentiometer” so that the output voltage reaches the value you want.
2. Adjust the right button so that Digital meter shows the value of output current;Wire shorted output terminal, then adjust the “current potentiometer” so that the output current reaches a predetermined LED operating current.
3. Connect LED, work. (1,2 steps as: Output is unloaded, do not connect LED)
Voltmeter and ammeter calibration method
1. Module with manual calibration function can correct display precision voltage and current, if you think the current voltage and current accuracy to meet the requirements, do not perform the following operations.
2. Output voltage calibration steps
- Step 1, adjust the right button so that “OUT” LED lighted, Digital meter shows the value of output voltage; Press the right button for more than 2 seconds, release, Digital meter and "OUT" LED flashes in synchronization so that you enter the output voltage calibration mode.
- Step 2, press the right button (normal speed), the voltage value is adding up a unit; Press the left button, minus a unit; Due to a unit is less than 0.1V, the minimum voltage display to 0.1V, so you need to continuously press 1-5 times to see the voltmeter change 0.1V, how many times voltmeter change 0.1V by pressing the key, depending on the current display voltage, the higher the voltage, the fewer the number of press.
- Step 3, press the right button for more than 2 seconds, release, to exit the output voltage calibration mode. All parameters set to automatically power down to save.
3. Input voltage calibration steps
- Step 1, adjust the right button so that "IN" LED lighted, Digital meter shows the value of input voltage; press the right button for more than 2 seconds, release, Digital meter and "IN" LED flashes in synchronization so that you enter the input voltage calibration mode.
- Steps 2 and 3, consistent with the output voltage calibration method.
4. Output current calibration steps
- Step 1, adjust the right button so that Digital meter shows the value of output Current. Press the right button for more than 2 seconds, release, Digital meter flashes in synchronization so that you enter the output current calibration mode.
- Step 2, connected to the load, ammeter in series, adjust the right and left button to change the display of digital meter, so that is consistent with the ammeter display .
Specification
1. Model LDTR-WG0181
2. Quantity: 1 piece
3. Material: PCB
4. Input Voltage: 5~36V
5. Output Voltage: 1.25~32V
6. Max. Output Current: 5A
7. Max. Output Power: 75W
8. Working Temperature: -40~+85℃
9. Conversion Efficiency: 96%
10. Dimensions: 2.76 in x 1.57 in x 0.59 in (7 cm x 4 cm x 1.5 cm)
11. Weight: 1.2 oz (34 g)
1. Packing List:
- 1 x Module
- 1 x Heatsink
- 4 x Pillars