Discover and buy more than 230,000 products
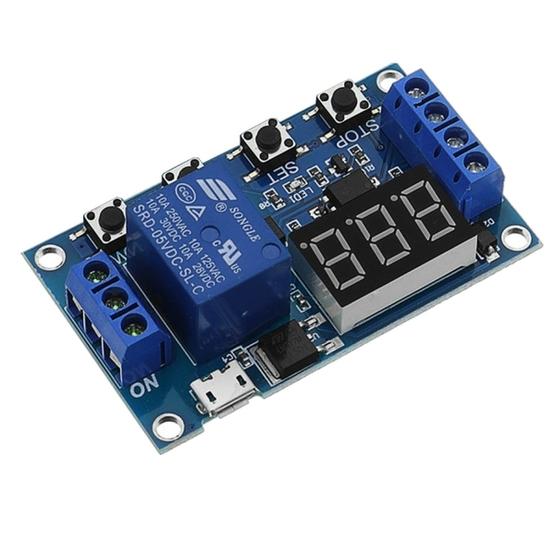

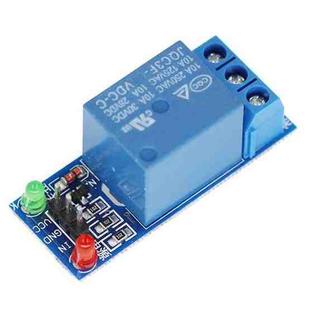
LDTR-WG0199 DC 6V To 30V One Way Relay Module Delay Power Off Disconnection Trigger Delay Cycle Timer Circuit Switch (Blue)
Item ZY14088657L

Warehouse: CN
Lead time: Item will be ready for ship between 29 Jul and 30 Jul 2025

Description
Parameters:
1. Operating voltage: DC 6V-30V (supports micro USB 5V)
2. Trigger signal source: High-level trigger (3V-24V) signal and systematically improve the system's anti-interference ability (also short-circuit altogether)
3. Output capability: Can control equipment that within DC 30V 5A or AC 220V 5A
4. Static current: 20mA
5. Working current: 50mA
6. Service life: More than 100,000 times
7. Working temperature: -40 degree C to 85 degree C
8. Size: 6.2*3.8*1.7cm (length*width*height)
Relay enable mode:
1. ON: the relay is allowed to turn on during the OP conduction time;
2. OFF: the relay is disabled and always closed.
3. Short press the STOP button on the main interface to switch between ON and OFF. The current state will flash, and then return to the main interface. (this function is an emergency stop function, one-touch disconnected relay)
Sleep mode:
1. C-P sleep mode: no operation within five minutes, the digital tube automatically shuts off the display and the program runs normally;
2. O-d normal mode: the digital tube is always on display;
3. Press and hold the STOP button for 2 seconds and release it to switch between the C-P and O-d states. The current state will flash, and then return to the main interface.
Operating mode:
1. P1: After the signal is triggered, the relay turns on the OP time and then turns off; during the OP time, the following operation
- P1.1: Signal is invalid again
- P1.2: Signal triggered again
- P1.3: The signal triggers a reset again, the relay opens, and the timer stops.
2. P2: For the trigger signal, after the relay is turned off for CL time, the relay turns on the OP time. After the timing is completed, the relay is turned off;
3. P3.1: For the trigger signal, after the relay turns on the OP time, the relay turns off the CL time, and then it circulates the above-mentioned action. In the cycle, the signal is given again, the relay is disconnected, and the time is stopped; the number of loops (LOP) can be set;
4. P3.2: After the power is turned on, no trigger signal is needed. The relay turns on the OP time, the relay turns off the CL time, and the above action is repeated. The loop number (LOP) can be set.
5. P4: Signal hold function if there is a trigger signal, the timer is cleared and the relay remains on; when the signal disappears, the relay is turned off after the timer OP; during the timer, there is another signal and the timer is cleared.
How to set parameters:
1. First determine the relay operating mode;
2. According to the working mode of the relay, in the main interface (when the module is powered on, it will flash the current working mode (default P1.1 mode), and then enter the main interface,) "press and hold the SET button for 2 seconds to release "enter the mode selection interface, select the mode to be set (P1.1~P-4) by pressing the UP and DOWN keys;
3. After selecting the mode to be set (for example, P3.2), short-press the SET button to set the corresponding parameter, then the parameter to be set will blink (OP conduction time, CL disconnection time, LOP cycle times ("-- - "on behalf of infinite number of cycles)), through UP, DOWN adjust the parameter value, support long press (fast increase or decrease) and short press (increase or decrease 1 unit); after setting the parameter value, press STOP key shortly To select the decimal point position, select the time range (the corresponding time 0.1 seconds ~ 999 minutes); short press the SET button to set the next parameter of the current mode, the process is the same as above;
4. After setting the parameters of the selected mode, press and hold the SET button for 2 seconds and release it. The currently set mode will flash, then return to the main interface, and set the parameters successfully.
5. Main interface: "000" (no decimal point) is displayed when the relay is not working. The relay is in working state with a decimal point. It is very clear!
6. Mode selection interface: long press the SET button to enter, after the setting is completed, long press the SET button to exit, return to the main interface
Package included:
1 X One way relay module
Related products